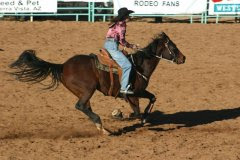
At some time or other, we all will try to photograph something that is just not standing still. If you take a shot of something moving really fast, there is a possibility that your image will come out blurred. The reason this happens is that the camera shutter speed is not set fast enough to "freeze" the subject. Its not a problem if you are photgraphing a small child running because they usually don't move fast enough to cause blurring while the shutter is open. However, if you are photographing something like a car race or fast sporting event, you need to use a very fast shutter speed to "freeze" the action. (see example 1)
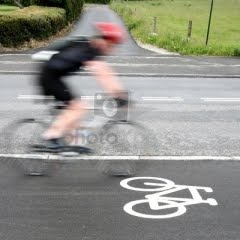
Sometimes subject blur in the image is acceptable. It will actually convey the sense of speed. Thats ok if you don't need a sharp image of the subject. (see example 2) Notice the background is sharp although the subject is blurred.
But there is another way to convey the sense of speed and get a relatively sharp subject image. It is called panning. It is a tried and true method that has been around for years. Here is what you do to pan. Frame the subject in your view finder as it is moving. The direction can be either left to right or right to left. (even up and down). Angle your body towards the subject and move the camera along with your body in the same direction that the subject is moving. Snap the picture while you and the subject are still moving. (shutter speeds of 1/60 to 1/125 are good for this method). The result will be a subject that is pretty much in focus and a background that is blurred due to the cmaera movement. This really emphasizes movement in the image. (See example 3)
It will take a little practice to pan in the beginning, but once you get it, you will have another tool in you photo skills arsenal.
Click here for more info on Taking Great Pictures or click any other link on this page.
Feel free to leave comments or suggestions on this page.
Showing posts with label photography. Show all posts
Showing posts with label photography. Show all posts
Tuesday, April 13, 2010
Wednesday, April 7, 2010
What is the Macro setting all about?
We have all seen photos of flowers that are stunning and show great detail. Perhaps you tried to do the same thing with your camera and couldn't get the shot because the camera wouldn't focus when you got close to the subject. That is because the camera lens focusing ability might start at maybe only 1.5 feet. (so you can't focus on objects only 8 inches away.
The Macro setting on a camera lens provides the ability to photograph a small object at a very close up range and still get a picture that shows great detail. The original meaning of macro meant that you could photograph a small object and produce an image the same size of the object. That would be called a 1:1 ratio. However, the standards have been relaxed and lenses that produce 1:2 ratio (images one half the size of the original object) are being called macro lenses.
Most camera today including point and shoot types have a macro setting. The macro setting will usually be indicated by an icon picture of a flower. That is because its probably the most common use for the macro setting. However, you can use it for any extreme close up you desire. Besides flowers, try eyes, or an insect, or any small object that you are interested in photographing.
Shooting in the macro mode will create more opportunities for you to take great images.
For more info, try http://goodpics.info/
http://awesomepics.info/
The Macro setting on a camera lens provides the ability to photograph a small object at a very close up range and still get a picture that shows great detail. The original meaning of macro meant that you could photograph a small object and produce an image the same size of the object. That would be called a 1:1 ratio. However, the standards have been relaxed and lenses that produce 1:2 ratio (images one half the size of the original object) are being called macro lenses.
Most camera today including point and shoot types have a macro setting. The macro setting will usually be indicated by an icon picture of a flower. That is because its probably the most common use for the macro setting. However, you can use it for any extreme close up you desire. Besides flowers, try eyes, or an insect, or any small object that you are interested in photographing.
Shooting in the macro mode will create more opportunities for you to take great images.
For more info, try http://goodpics.info/
http://awesomepics.info/
Friday, March 19, 2010
Photography Basics-Learn the Rule of Thirds
Many times when someone prepares to take a picture, they will point the camera at the subject and then center the subject to the best of their ability. That is ok since they obviously will get the subject in the frame and probably won’t cut off much if any of the subject. As I mentioned, that’s ok, but let’s learn a different technique.
A popular tool that has been used by artists and photographers for years is the Rule of Thirds.
A popular tool that has been used by artists and photographers for years is the Rule of Thirds.
Lets get started with it. When looking through the viewfinder, picture a nine part grid in your mind. (if there is not a grid already built into your view finder.) Build the grid by imagining two horizontal lines across the viewfinder dividing it into thirds. Then do the same with two vertical lines. You now have a grid with nine different sections. The areas where the vertical and horizontal lines intersect are called the points of interest.
Ok, now here is how the Rule of Thirds works. When composing your picture, try to place your primary elements at, or around one or more of the points of interest. In essence what this does is to direct the eye away from the dead center of the picture and give the image more balance. This can make for a more interesting picture. In the case of a horizon or tree lines that flow from one side of the image to the other, this works well if you place the horizon or tree line near one of the horizontal grid lines rather than right in the middle of the frame. It works just as well with your vertical lines in the image. Keep in mind that the subject doesn’t have to be directly on a point of interest or exactly on a vertical or horizontal grid line. (just somewhere in the ares) This is where you use your judgment and decide what you like best. It’s a little trickier when shooting close up portraits. Instead of trying to use the points of interest for a face, try lining the eyes along the horizontal grid line.
Learn this technique and try it few times to see if you notice a more balanced and powerful final image. This rule should help, but don’t be afraid to break it if you feel more comfortable doing your own thing.
Click for more info:
http://www.goodpics.info/
http://www.awesomepics.info/
Ok, now here is how the Rule of Thirds works. When composing your picture, try to place your primary elements at, or around one or more of the points of interest. In essence what this does is to direct the eye away from the dead center of the picture and give the image more balance. This can make for a more interesting picture. In the case of a horizon or tree lines that flow from one side of the image to the other, this works well if you place the horizon or tree line near one of the horizontal grid lines rather than right in the middle of the frame. It works just as well with your vertical lines in the image. Keep in mind that the subject doesn’t have to be directly on a point of interest or exactly on a vertical or horizontal grid line. (just somewhere in the ares) This is where you use your judgment and decide what you like best. It’s a little trickier when shooting close up portraits. Instead of trying to use the points of interest for a face, try lining the eyes along the horizontal grid line.
Learn this technique and try it few times to see if you notice a more balanced and powerful final image. This rule should help, but don’t be afraid to break it if you feel more comfortable doing your own thing.
Click for more info:
http://www.goodpics.info/
http://www.awesomepics.info/
Subscribe to:
Posts (Atom)