Zoom is a wonderful camera feature that can give different perspetives to the final image. But most people don't know the difference betweeen optical and digital zoom. The difference is actually important and affects how your final image will look. Every camera has sensors beheind the lens that records light and colors coming into the camera. When you use an optical zoom, the lens actually magnifies the image that will be recorded on the sensor. If the lens works okay, this will not be a problem because if the camera has 5 megapixels, the enlarged or shrunk image will be recorded with all of the 5 megapixels. When the digital zoom is used, the pixels that are already recorded in the sensors are enlarged. Lets say you frame the orignal image. Then you zoom in closer by 50%. What the digital zoom does is crop half the image and will only use half the pixels. The pixel that are cropped out of the frame will not be used. So the digital zoom will increase the size of the image, but will only use half the pixels. The result is a less detailed picture. To sum things up, it is better to use the optical zoom because you will not lose the details of the image when it it zoomed in or enlared.
I hope this helps. Feel free to leave a comment if you like. Click here For more info on digital photography
Or click here for wedding photography
Thursday, April 15, 2010
Tuesday, April 13, 2010
Fast Moving Subject? Try Panning
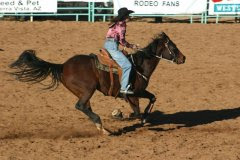
At some time or other, we all will try to photograph something that is just not standing still. If you take a shot of something moving really fast, there is a possibility that your image will come out blurred. The reason this happens is that the camera shutter speed is not set fast enough to "freeze" the subject. Its not a problem if you are photgraphing a small child running because they usually don't move fast enough to cause blurring while the shutter is open. However, if you are photographing something like a car race or fast sporting event, you need to use a very fast shutter speed to "freeze" the action. (see example 1)
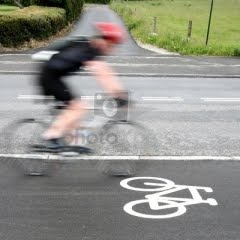
Sometimes subject blur in the image is acceptable. It will actually convey the sense of speed. Thats ok if you don't need a sharp image of the subject. (see example 2) Notice the background is sharp although the subject is blurred.
But there is another way to convey the sense of speed and get a relatively sharp subject image. It is called panning. It is a tried and true method that has been around for years. Here is what you do to pan. Frame the subject in your view finder as it is moving. The direction can be either left to right or right to left. (even up and down). Angle your body towards the subject and move the camera along with your body in the same direction that the subject is moving. Snap the picture while you and the subject are still moving. (shutter speeds of 1/60 to 1/125 are good for this method). The result will be a subject that is pretty much in focus and a background that is blurred due to the cmaera movement. This really emphasizes movement in the image. (See example 3)
It will take a little practice to pan in the beginning, but once you get it, you will have another tool in you photo skills arsenal.
Click here for more info on Taking Great Pictures or click any other link on this page.
Feel free to leave comments or suggestions on this page.
Labels:
action,
movement,
panning,
photography,
speed
Wednesday, April 7, 2010
What is the Macro setting all about?
We have all seen photos of flowers that are stunning and show great detail. Perhaps you tried to do the same thing with your camera and couldn't get the shot because the camera wouldn't focus when you got close to the subject. That is because the camera lens focusing ability might start at maybe only 1.5 feet. (so you can't focus on objects only 8 inches away.
The Macro setting on a camera lens provides the ability to photograph a small object at a very close up range and still get a picture that shows great detail. The original meaning of macro meant that you could photograph a small object and produce an image the same size of the object. That would be called a 1:1 ratio. However, the standards have been relaxed and lenses that produce 1:2 ratio (images one half the size of the original object) are being called macro lenses.
Most camera today including point and shoot types have a macro setting. The macro setting will usually be indicated by an icon picture of a flower. That is because its probably the most common use for the macro setting. However, you can use it for any extreme close up you desire. Besides flowers, try eyes, or an insect, or any small object that you are interested in photographing.
Shooting in the macro mode will create more opportunities for you to take great images.
For more info, try http://goodpics.info/
http://awesomepics.info/
Subscribe to:
Posts (Atom)


